How to Create a Project Plan: A Worked Office Relocation Example
Most advice on how to create a project plan stays abstract: define your goals, list your tasks, assign owners. All true, and not much help when you are staring at an empty plan. So this post builds one. The example is a small office relocation, and every date in it is a real date in a real schedule you can open in Gantto.
Here is the finished plan before we take it apart.
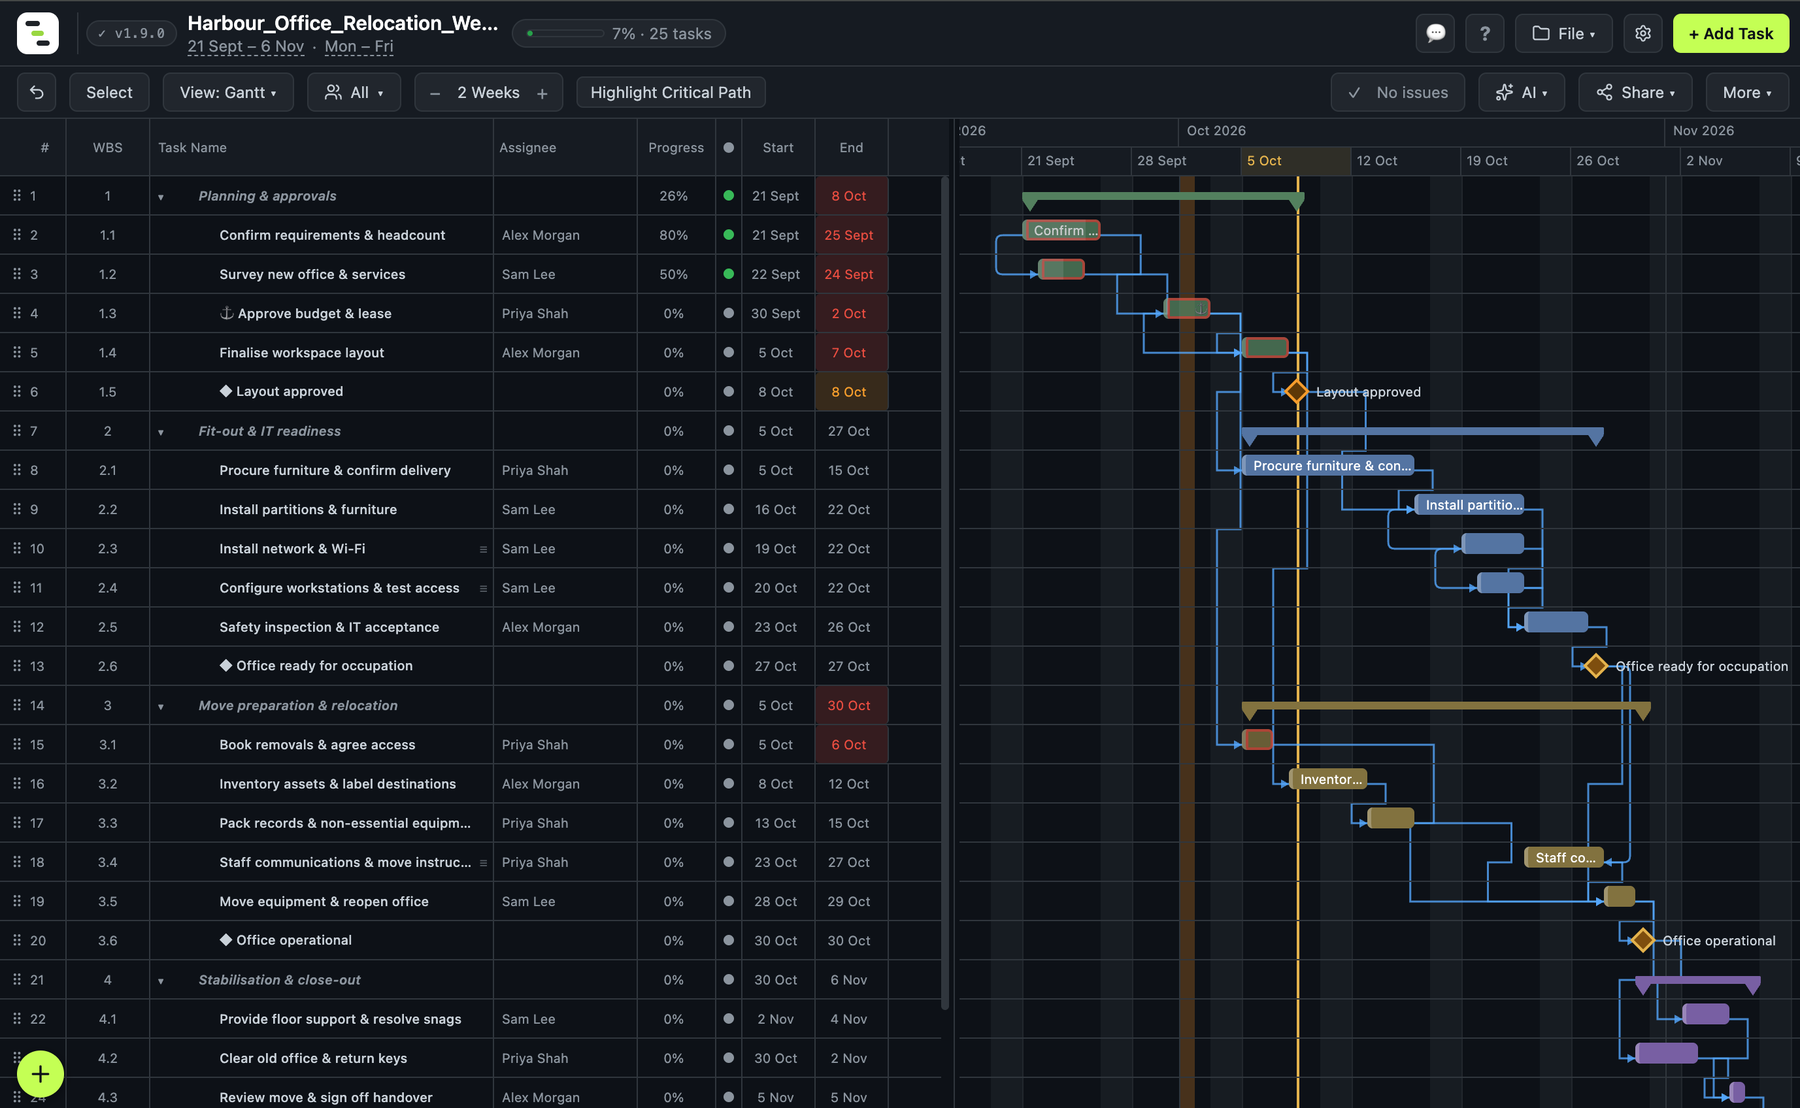
It has 25 rows (four phases, 17 tasks and the milestones), running from Monday 21 September to Friday 6 November. Three owners share the work. Here is how it was put together.
Step 1: Start from the finish and the phases
Do not start by listing tasks. Start with the question "what has to be true at the end?" For a move, that is a working office and a signed-off handover. Then work backwards to the big stages. This plan has four:
- Planning and approvals: decide what you need, find the space, get the money agreed.
- Fit-out and IT readiness: furniture, partitions, network, workstations, inspection.
- Move preparation and relocation: removals, inventory, packing, staff communications, the move itself.
- Stabilisation and close-out: support after the move, clearing the old office, handover.
Four phases is a useful size. You can hold it in your head, and each phase has an obvious end. In Gantto these are summary tasks, so you can collapse the plan down to four bars when you are talking to someone senior and expand it when you are working.
Step 2: Break each phase into tasks one person can own
A task is the right size when one person owns it and you can say what "done" looks like. In this plan the tasks run from one working day to nine, and every one has a single named owner.
| WBS | Task | Owner | Start | End | Working days |
|---|---|---|---|---|---|
| 1.1 | Confirm requirements & headcount | Alex Morgan | Mon 21 Sept | Fri 25 Sept | 5 |
| 1.2 | Survey new office & services | Sam Lee | Tue 22 Sept | Thu 24 Sept | 3 |
| 1.3 | Approve budget & lease | Priya Shah | Wed 30 Sept | Fri 2 Oct | 3 |
| 1.4 | Finalise workspace layout | Alex Morgan | Mon 5 Oct | Wed 7 Oct | 3 |
| 2.1 | Procure furniture & confirm delivery | Priya Shah | Mon 5 Oct | Thu 15 Oct | 9 |
| 2.2 | Install partitions & furniture | Sam Lee | Fri 16 Oct | Thu 22 Oct | 5 |
| 2.3 | Install network & Wi-Fi | Sam Lee | Mon 19 Oct | Thu 22 Oct | 4 |
| 2.4 | Configure workstations & test access | Sam Lee | Tue 20 Oct | Thu 22 Oct | 3 |
| 2.5 | Safety inspection & IT acceptance | Alex Morgan | Fri 23 Oct | Mon 26 Oct | 2 |
| 3.1 | Book removals & agree access | Priya Shah | Mon 5 Oct | Tue 6 Oct | 2 |
| 3.2 | Inventory assets & label destinations | Alex Morgan | Thu 8 Oct | Mon 12 Oct | 3 |
| 3.3 | Pack records & non-essential equipment | Priya Shah | Tue 13 Oct | Thu 15 Oct | 3 |
| 3.4 | Staff communications & move instructions | Priya Shah | Fri 23 Oct | Tue 27 Oct | 3 |
| 3.5 | Move equipment & reopen office | Sam Lee | Wed 28 Oct | Thu 29 Oct | 2 |
| 4.1 | Provide floor support & resolve snags | Sam Lee | Mon 2 Nov | Wed 4 Nov | 3 |
| 4.2 | Clear old office & return keys | Priya Shah | Fri 30 Oct | Mon 2 Nov | 2 |
| 4.3 | Review move & sign off handover | Alex Morgan | Thu 5 Nov | Thu 5 Nov | 1 |
Two things are worth noticing. First, the longest task is procurement at nine working days, and that is not nine days of effort. It is a supplier lead time. Durations in a plan are elapsed working time, so a task someone mostly waits on still takes up the calendar. Second, every task name is a verb and an object. "Book removals" is something you can finish. "Removals" is a topic.
Step 3: Let dependencies set the dates
You will notice that most of the dates above were not typed by hand. You give each task a duration and say what it waits for, and the start and end dates follow. Look at the pattern in the table:
- Procurement ends Thursday 15 October and installation starts Friday 16 October, the next working day. Installation cannot begin until the furniture is there.
- Booking removals (3.1) and procuring furniture (2.1) both start on Monday 5 October, the working day after the budget and lease approval finishes. One decision unlocks two streams of work.
- Install network (2.3) and Configure workstations (2.4) both overlap the furniture installation and finish on the same Thursday. They are parallel work done by the same person, so this is also where you would check that Sam Lee is not double-booked.
This is the step that turns a list into a plan. If you type every date yourself, the plan is a drawing. If you describe the relationships, the plan can answer questions, and the next post, what happens when one task slips, shows exactly that on this plan.
Step 4: Add milestones as gates
A milestone is a task with no duration that marks something being true. This plan has three that matter:
- Layout approved: Thursday 8 October, the end of the planning phase.
- Office ready for occupation: Tuesday 27 October, after the safety inspection and IT acceptance.
- Office operational: Friday 30 October, after the move.
Milestones are what you report against. Nobody outside the project needs to know that the inventory finishes on a Monday, but they do want to know whether the office is ready. They are also the natural material for a simpler view, which is covered in project timeline vs Gantt chart.
Step 5: Read the plan back for risk
Once the plan exists, read it as a sceptic. In this one:
- The move itself is two days, 28 and 29 October, and the close-out work is scheduled straight after it. There is no obvious buffer between them.
- Nine days of furniture procurement sits at the front of the fit-out. If delivery slips, installation, inspection, the ready milestone and the move all move with it.
- Alex Morgan owns requirements, the layout, the safety inspection, the inventory and the final sign-off, so one person's absence touches five tasks across all four phases.
None of this is visible in a list of tasks. All of it is visible in a plan with dates and links, which is the point of making one.
What this plan does not cover
A plan like this is the schedule part of a project plan. It does not hold the budget, the risk register, or the communication plan itself (only the task to write it). For a small project that is usually fine, and a schedule is the part that most needs a tool. For a larger one, keep those alongside it.
Build your own
Start with a blank plan in the free editor, or open one of the project templates and adapt it. Add the four phases first, then the tasks, then the links, and only then look at the dates. If you want to see the editor in motion first, here is the short introduction video.
Related reading: How to Create a Gantt Chart · What happens when one task slips · Project templates
Build your own plan in Gantto and see the phases, tasks and dependencies on one timeline.